
Style your Email with HTML Table in the Contact Form 7 [updated 2020]
Contact Form 7: 5.1.7 ✔
Contact Form 7 provide inline HTML options. Yes, you can add an HTML table directly to your Contact Form 7 Message body in the Mail Tab. This will stylize and your email and looks better when you receive it in your inbox.
If you are looking to stylize your Contact form front-end with Boostrap CSS then check this article Beginner’s Guide to Bootstrap CSS in the Contact Form 7 [updated 2020].
I will also be covering all the form fields in the Mail Tab along with the Message body. Understanding those fields is really helpful too.
But if you want to go straight to adding HTML to your email body then you can jump right to the Message body section
- Index
- Troubleshooting
- Exclude lines with blank mail-tags from output is not working [Troubleshooting]
- How to send the Email to multiple users? [Troubleshooting]
- How to add CC and BCC to the email? [Troubleshooting]
- I have added the HTML code but there are no changes in the email. [Troubleshooting]
- I am not receiving email. [Troubleshooting]
- I have used the Mail tag in my ‘Subject’ field but why it is showing error. [Troubleshooting]
I try to explain everything about the Mail tab from ‘Contact Form 7’ in this tutorial, except the ‘File Attachment’. File Attachment can have a separate tutorial altogether, there’s a lot more to cover. I’ll do another tutorial about File Attachment in the future.
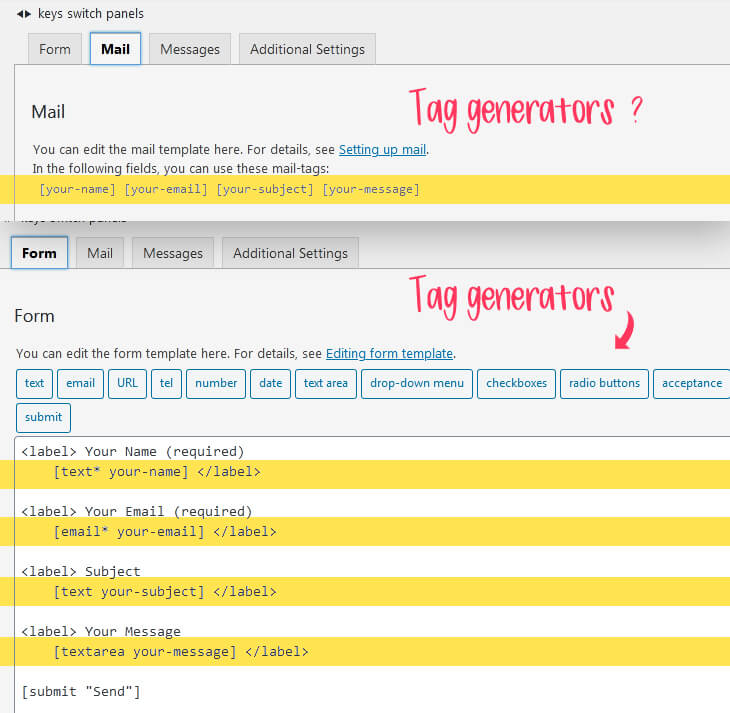
What are Mail tags?
The tags on a Mail Tab corresponds to the ‘Form Tab’. In other words, if you need more tags you need to add them in your Form tab first and include them into your Form.
That’s the reason the ‘Tag Generators’ are available only in the Form Tab and not in the Mail Tab.
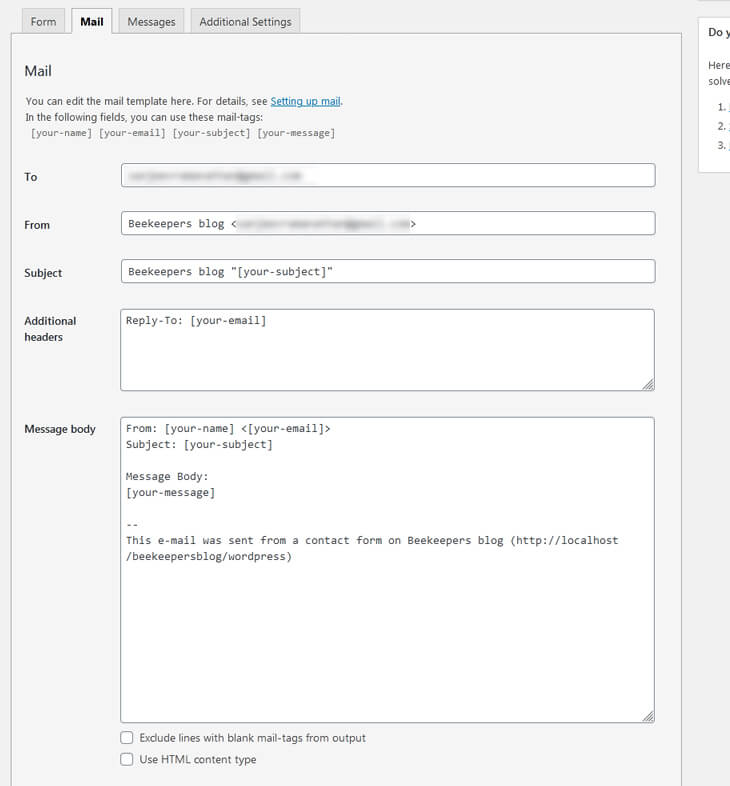
Understanding the Mail Tab
Let’s look at each of the fields listed in the Mail tab. Every field is important and required except for Additional headers.
When you create a new form in the Contact Form 7, the Form tab generates with the standard template, and all generated tags are automatic assigns here in the Mail Tab as well.
So the groundwork is already laid out for you, all you need to do is to customize the fields to your need. Watch out, if you are editing each of the fields, you need to follow the correct syntax to avoid errors.
Don’t worry I will try my best to explain everything I can and help you how to customize each of the fields to avoid errors.
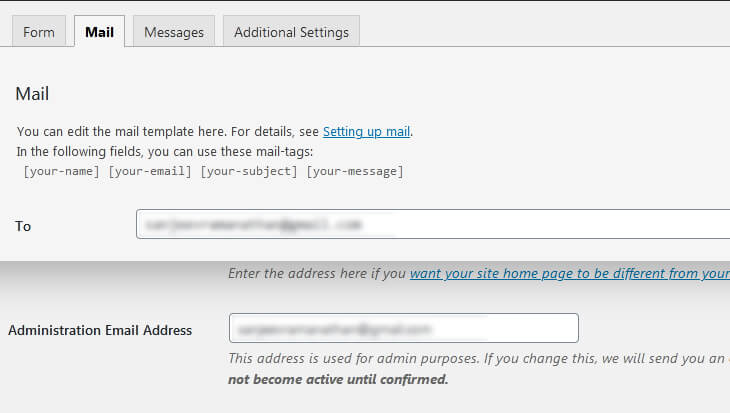
To
By default, Contact Form 7 uses the same email address you set in the ‘Administration Email Address’ from the General Settings in WordPress.
Can I change this email id?
Yes, you can. Enter a valid email id, because this is the email id the form will be sent to.
Can I send it to multiple users?
Yes, you can. You need to separate them by a comma. See the table below for the proper syntax.
Use the proper syntax to avoid any errors.
Here’s the list of syntax you can use.
| Syntax to use in the ‘To’ field | ||
|---|---|---|
| ✔ Valid | ||
johndoe@example.com✔ Plain Email id
|
||
<johndoe@example.com>✔ Wrapper (
< > ) around the Email id |
||
John doe <johndoe@example.com>✔ Email id with the Name
|
||
[your-email]✔ Using Email Mail tag
|
||
<[your-email]>✔ Wrapper (
< > ) without the name |
||
John Doe <[your-email]>✔ Mail tag with the Name
|
||
[your-name] <[your-email]>✔ Using only Mail tags
|
||
Susan <susan@example.com>, Michael Jr. <michaeljr@example.com>✔ Multiple user separated by comma
|
||
| ✖ Invalid | ||
John doe johndoe@example.com✖ Email id without the wrapper (
< > ) |
||
<johndoe@example.com> John doe✖ Name after the Email id
|
||
your-email✖ Mail tag without the square brackets (
[ ] ) |
||
John Doe [your-email]✖ Mail tag without the wrapper (
< > ) |
||
<[your-email]> John Doe✖ Name after the Email id
|
||
[your-name]✖ Email tag is missing
|
||
How do I know if it’s valid or not?.
If your value is invalid, you will get a message under the relevant field before you save the file Invalid mailbox syntax is used.
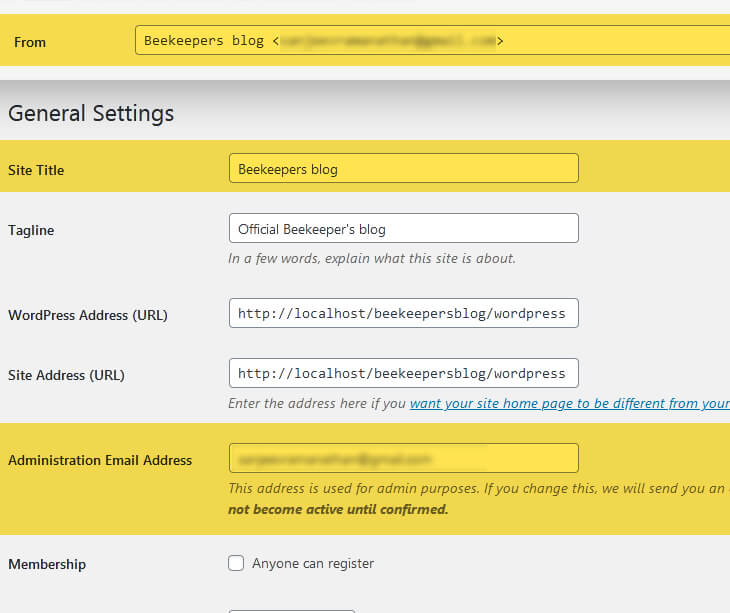
From
By default ‘From’ field contains the ‘Site Title’ and the ‘Administration Email Address’ from the General Settings in WordPress.
You can pretty much use the same syntax you used in the ‘To’ fields. See the Table 1 Syntax for the ‘To’ field.
Subject
By default Contact Form 7 adds your domain name along with the "[your-subject]" Mail tag. You can leave this field as default. It is pretty straight forward.

| Syntax to use in the ‘Subject’ field | ||
|---|---|---|
| ✔ Valid | ||
New Requirement for the Webdesign✔ Plain text without any Mail tag
|
||
Subject line [your-subject]✔ Plain text with Mail tag.
|
||
[your-name] send requirements - [your-email]✔ Using multiple Mail tags
|
||
[your-name]✔ Using only Mail tag. (See the Note message after the table)
|
||
| ✖ Invalid | ||
|
✖ You cannot leave the field blank.
|
||
If the field is set to required ( [text* your-subject] marked by the asterisk ). Then you can use the Mail tag ( [your-subject] ) without the quote around. As you know ‘Required’ attribute means the user cannot skip this field and requires their input.
If the field is NOT required ( [text your-subject] without the asterisk ), then you need to use a quote around your Mail tag ( "[your-subject]" ). If you are not using the quote, you will get an error.
Additional headers
You use additional headers to include ‘Cc’ and ‘Bcc’ to your email. Watch out for the valid syntax when using the Cc and Bcc. Refer to the table below.
By default Contact Form 7 Mail tab provides Reply-to: with the [your-email] Mail tag.
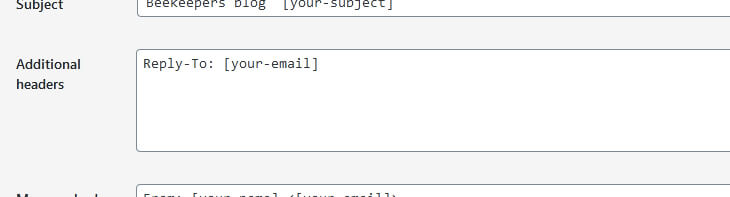
Table 2 below lists out Valid and Invalid syntax on using the Additional headers.
| Syntax to use in the ‘Additional headers’ field | ||
|---|---|---|
| ✔ Valid | ||
Reply-To: [your-email]✔ A standard and default Reply-to
|
||
Cc: boss@example.com✔ Cc and Reply-to. One header per line. Yes you can switch, Reply-to top and Cc at the bottom.
|
||
|
✔ You can also leave the field empty
|
||
| ✖ Invalid | ||
Cc: boss@example.com Reply-To: [your-email]✖ You cannot have both on a single line. Only one header per line.
|
||
Reply To: [your-email]✖ Reply-to without the hyphen (
- ) |
||
Reply-To [your-email]✖ Reply-to without the colon (
: ) |
||
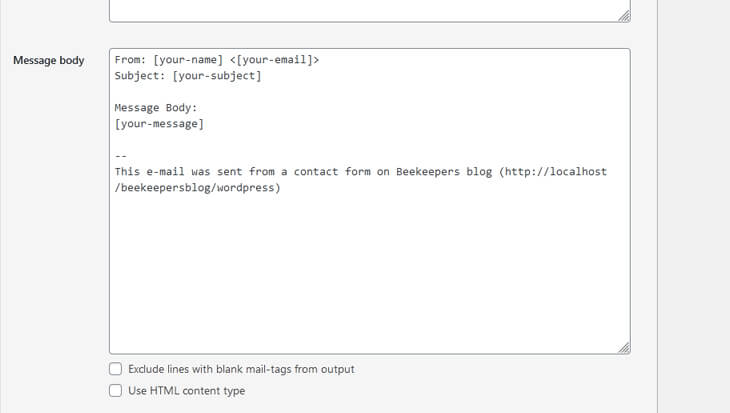
Message body
The Message body is where you add all your email body text. This is where you also add HTML to it.
By default Contact Form 7 adds the Mail tags with a simple text.
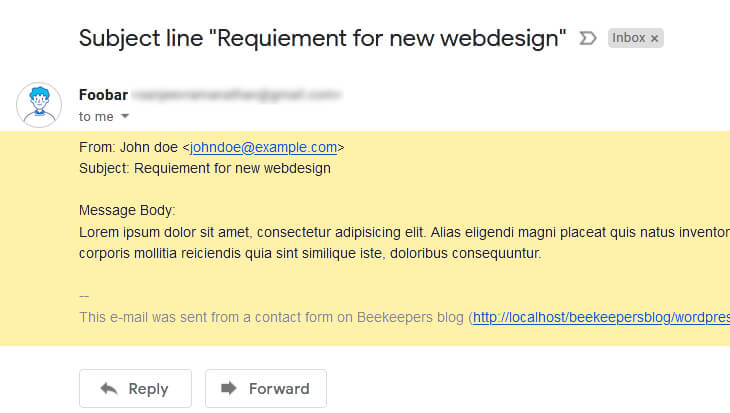
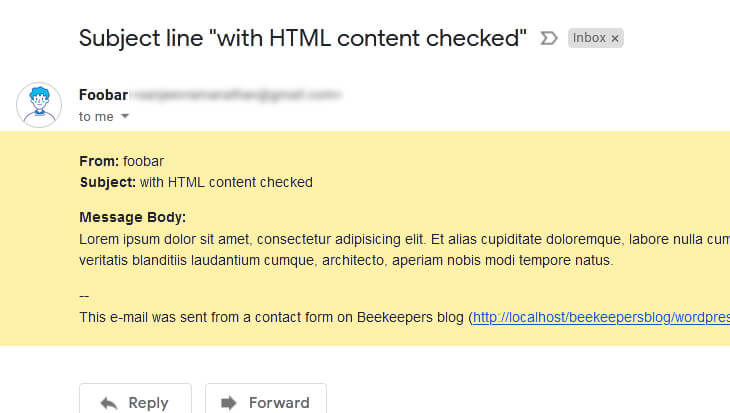
With the default Message body tags from Mail Tab in Contact Form 7, you will receive the email similar to the one below.
Let’s try a simple HTML wrapper to our body content. We will wrap all the heading with <strong> element
<strong>...</strong>
Add the <strong> element to the From, Subject, and Message body. And check the box that says Use HTML content type, this will wrap your message body with standard HTML.
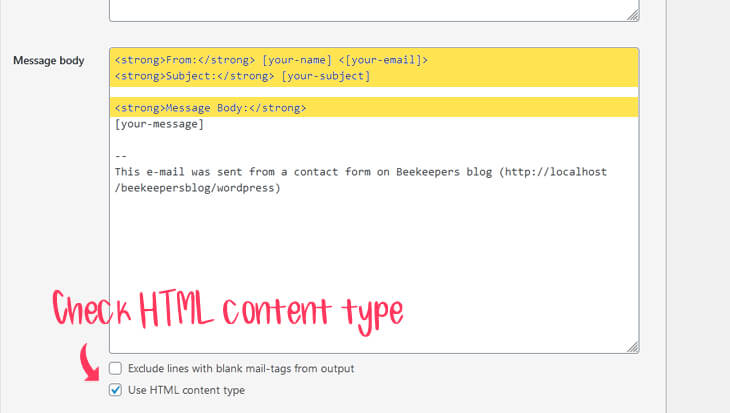
After adding the HTML <strong> wrapper and turn on the Use HTML content type you can see the titles are now bold.
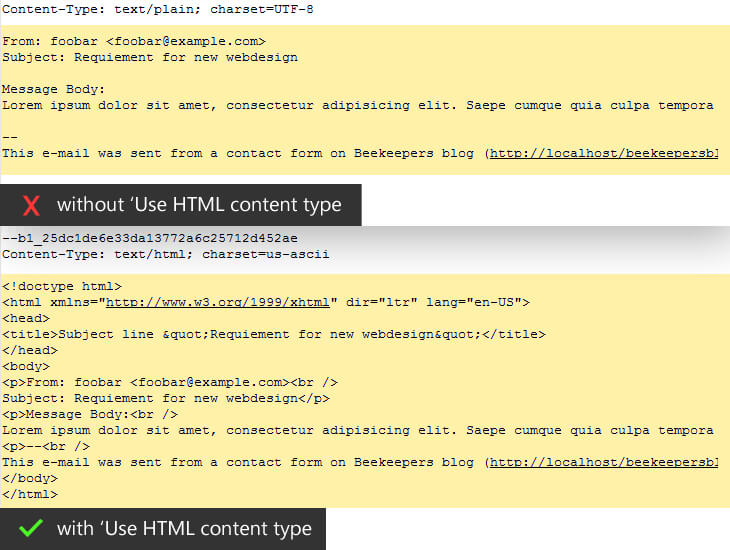
<strong> element around the title is not enough. You need to turn on the Use HTML content type. This will create the HTML around your message body.What happened in the background.
<strong> element from the Message body in the Mail tab.Here’s the image below that illustrates what happens when you turn on the Use HTML content type. The Contact Form 7 wraps your Message body with the HTML elements automatically.
Notice how the ‘Subject’ is wrapped with the <title>
This is what send to the email.
Now that we understand HTML elements, let’s add a table for our Message body. I have kept all the text as it is and only wraps them with table elements.
Instead of formatting your text, you can copy the code from below and paste it in your Message body field.
<table border="1" cellpadding="5">
    <tr>
        <td>From:</td>
        <td>[your-name] <[your-email]></td>
    </tr>
    <tr>
        <td>Subject:</td>
        <td>[your-subject]</td>
    </tr>
    <tr>
        <td>Message Body:</td>
        <td>[your-message]</td>
    </tr>
</table>

--
This e-mail was sent from a contact form on Beekeepers blog (http://localhost/beekeepersblog/wordpress)
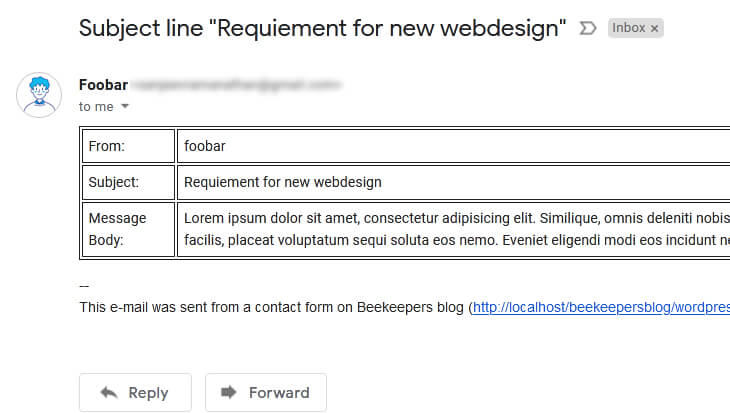
Here’s how it looks in the email. Pretty neat huh!
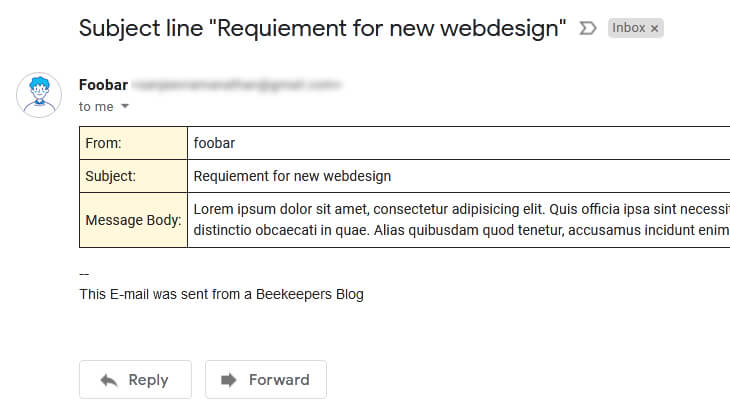
Here’s a cleaned-up version of the table (Fig 13). To avoid wrapping for the Message body. white-space:nowrap is added. Notice how the Message Body is wrapped in Fig 12 above.
The full code for Fig 13 is after the image.
<table border="1" cellpadding="5" style="border-collapse:collapse">
    <tr>
        <td style="background-color:cornsilk">From:</td>
        <td>[your-name] <[your-email]></td>
    </tr>
    <tr>
        <td style="background-color:cornsilk">Subject:</td>
        <td>[your-subject]</td>
    </tr>
    <tr>
        <td style="background-color:cornsilk; white-space: nowrap;">Message Body:</td>
        <td>[your-message]</td>
    </tr>
</table>

--
This E-mail was sent from a Beekeepers Blog
Exclude lines with blank mail-tags from output
A form usually has fields that need to be filled by the user, and sometimes you have optional fields that the user might or might not fill it. The fields that are not filled will be empty and you will receive those files in the email too (it will be empty, obviously). But what if you do not want to see the empty fields.
Well, that’s what this checkbox is for. Let’s look at an example below.
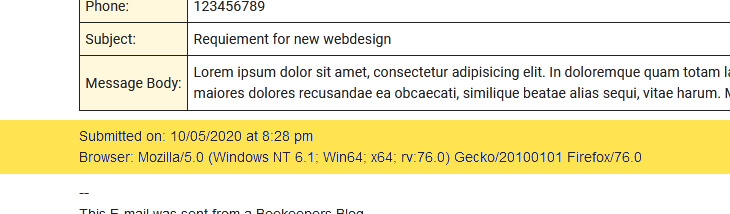
I have created a new ‘Phone’ field. This is not a required field, so the user can leave this empty when filling the form.
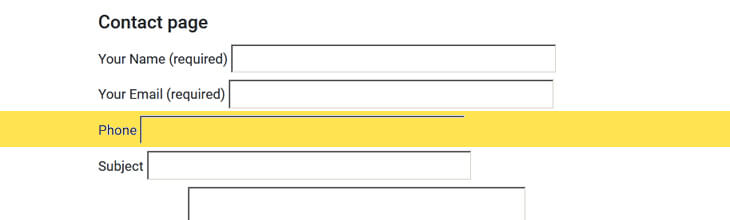
I have checked the Exclude lines with blank mail-tags from output checkbox and saved the form.
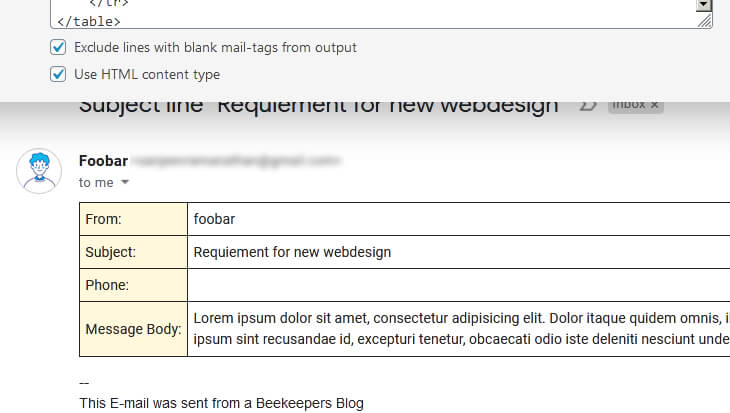
If you notice the output of the ‘Phone’ field is empty, but you still see the name ‘Phone’ in the table. You might be wondering what is the use of that checkbox. In the background, the Contact Form 7 does remove that line
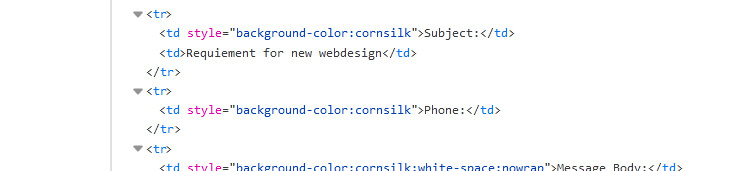
Let’s inspect that.
If we inspect the code, the <td> under the ‘Phone’ is missing. So the Contact Form 7 does remove that line, but to remove the label we need to do some adjustments to the code.
Let’s do that.
In your HTML table find the optional field, edit the code, and make it in a single line without using linebreak.
Don’t just join two <td> alone, include the <tr> as well. The <tr> is the ‘table-row’ and we want to tell the Contact Form 7 to remove the table row that associated with the ‘td’ if it’s empty.
...
    <tr>
        <td style="background-color:cornsilk">Subject:</td>
        <td>[your-subject]</td>
    </tr>
    <tr><td style="background-color:cornsilk">Phone:</td><td>[tel-680]</td></tr>
    <tr>
        <td style="background-color:cornsilk; white-space: nowrap;">Message Body:</td>
        <td>[your-message]</td>
    </tr>
...
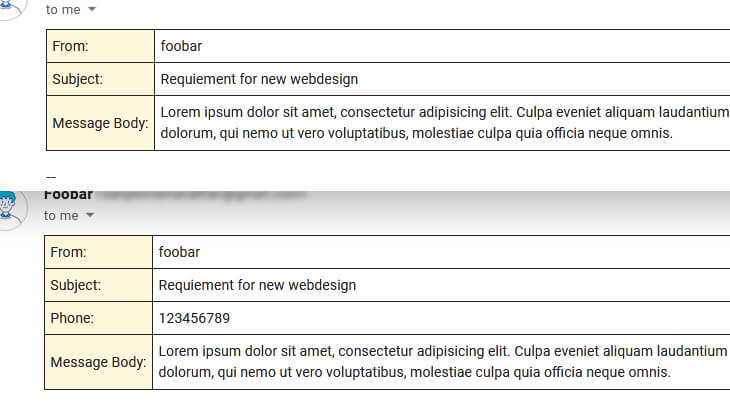
As you can see below, the image shows both the phone field is empty and filled.
This option is to keep the details tidy, but if you don’t mind about the empty fields and want to see all the details from the form, then you can uncheck the ‘Exclude lines with blank mail-tags from the output.’
If you have many fields, finding the not-required ones and make it as a single line is tiresome. Instead, you can make all the fields in a single line.
Watch out for the proper separation. There’s a line break for each table row.
<table border="1" cellpadding="5">
    <tr><td>From:</td><td>[your-name] <[your-email]></td></tr>
    <tr><td>Subject:</td><td>[your-subject]</td></tr>
    <tr><td>Phone:</td><td>[tel-680]</td></tr>
    <tr><td>Message Body:</td><td>[your-message]</td></tr>
</table>
Special Mail Tags
If you need more information from the user-end. Example the form submission date. You can use the Special mail-tags Contact Form 7 provides. There’s a whole bunch of tags you can include in your Message body.
But for this tutorial i will show you three tags. [_date], [_time], and [_user_agent]
Let’s add these tags under our table in the Mail tab.
<!-- table here -->
<p>Submitted on: [_date] at [_time]<br>Browser: [_user_agent]</p>
After you placed the code from above, save the changes. Next time if someone fills the form you will get their details similar to the one below.
| List of Special Mail Tags syntax |
|---|
| General |
[_remote_ip]: Submitter’s IP address |
[_user_agent]: Submitter’s user agent (browser) information. |
[_url]: URL of the page in which the contact form is placed. This is useful if you have multiple forms in your website and you can track down which page gets more traffic. |
[_date]: Date of the submission. |
[_time]: Time of the submission. |
[_invalid_fields]: Number of form fields with invalid input. |
[_serial_number]: Numeric string whole value increments, so this tag can work as the serial number of each submission. Requires Flamingo 1.5+ be installed. |
|
Post-related
For these to work, you need to place the Contact Form 7 inside the post content.
|
[_post_id]: ID of the post. |
[_post_name]: Name (slug) of the post. |
[_post_title]: Title of the post. |
[_post_url]: Permalink URL of the post. |
[_post_author]: Author name of the post. |
[_post_author_email]: Author email of the post. |
| Site-related |
[_site_title]: Title of the website. |
[_site_description]: Description (tagline) of the website. |
[_site_url]: home URL of the website. |
[_site_admin_email]: Email address of the primary admin user of the website. |
|
User-related
Works for the user that has an account in WordPress and logged in.
|
[_user_login]: Login name of the user. |
[_user_email]: Email address of the user. |
[_user_url]: Website URL of the user. |
[_user_first_name]: First name of the user. |
[_user_last_name]: Last name of the user. |
[_user_nickname]: Nickname of the user. |
[_user_display_name]: Display name of the user. |
Mail (2)
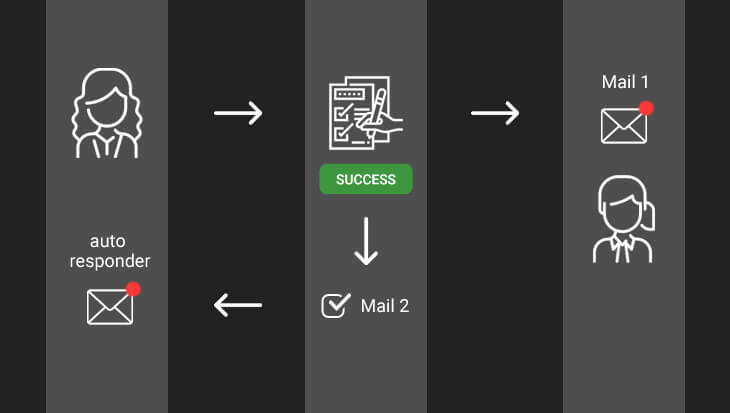
Mail (2) is nothing but an autoresponder to the user who sends the form to you. This will trigger only if the Primary Mail is sent successfully.
Turn on Mail (2) using the checkbox.
This will have the same fields of Mail (1) (Primary template). Also, notice all the pre-filled fields are default Contact Form 7 template.
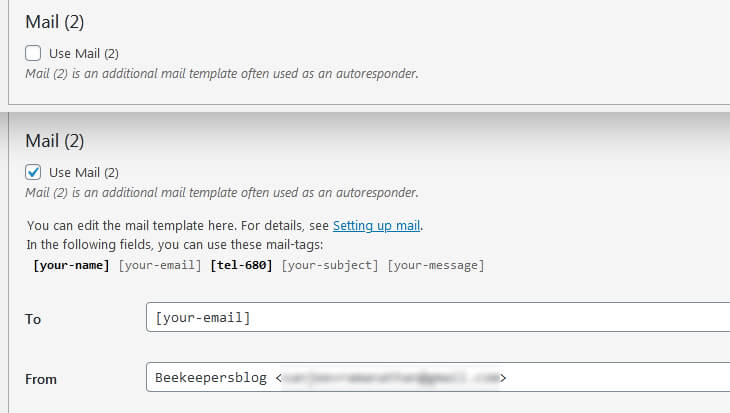
This fig will give you an idea of how Mail 2 works. You can also add the HTML codes in Mail 2 too.
NOTE: The mail 2 will work only if you activate them (checkbox)
Exclude lines with blank mail-tags from output is not working [Troubleshooting]
Solution 1: Make sure the label and the input elements are on the same line. If you are using table make the <tr> to </tr> are all on straight line.
Solution 2: When you are lining the table row in a straight line, make sure each table row is a separate line. Example…
<!-- ✔ Correct -->
<table>
    <tr><td>...</td></tr>
    <tr><td>...</td></tr>
    <tr><td>...</td></tr>
</table>

<!-- ✖ Wrong -->
<table><tr><td>...</td></tr><tr><td>...</td></tr><tr><td>...</td></tr></table>

<!-- ✖ Wrong -->
<table>
    <tr><td>...</td></tr><tr><td>...</td></tr><tr><td>...</td></tr>
</table>
How to send the Email to multiple users? [Troubleshooting]
You can use a comma to separate the email id in the To field. Refer the Table 1 (List of ‘Valid’ and ‘Invalid’ syntax for the To field.) for using proper syntax.
How to add CC and BCC to the email? [Troubleshooting]
Use the Additional header fields to add your Cc and Bcc. Refer the Table 3 (List of ‘Valid’ and ‘Invalid’ syntax for the Additional headers field.) for using proper syntax.
I have added the HTML code but there are no changes in the email. [Troubleshooting]
Make sure you have checked the box under the Message body that says Use HTML content type. See Figure 9 in the Message body field.
I am not receiving email. [Troubleshooting]
Solution 1: Test whether you can able to send an email from WordPress first.
Solution 2: Make sure you have entered the correct email address in the To field. If you are using string and a mail-tag, follow Table 1 for proper syntax.
Solution 3: Check the correct spelling of your email id.
I have used the Mail tag in my ‘Subject’ field but why it is showing error. [Troubleshooting]
Is your subject field is optional (meaning it does not have required="required" attribute), and you have added only the Mail tag in the Subject field?. If yes then you need to add quotes around the mail tag. This is something that officially not documented in the Contact Form 7 website. Follow the Notes under Table 2 in the Subject field.

 (14 votes, average: 1.14 out of 5)